
How to Flush a Tankless Water Heater Safely

A tankless water heater can deliver dependable hot water for years, but it cannot ignore the minerals moving through your home’s water supply. In San Jose and across the Bay Area, hard water can leave scale inside the heat exchanger over time. Learning how to flush a tankless water heater helps protect efficiency, preserve hot-water performance, and reduce the chance of an inconvenient shutdown.
Flushing is a manageable maintenance task for some homeowners, provided the unit is designed with isolation valves and you are comfortable following the manufacturer’s instructions. If your water heater is under warranty, has error codes, lacks service valves, or shows signs of a leak, professional service is the safer choice.
Why tankless water heaters need flushing
Unlike a traditional tank water heater, a tankless unit heats water as it passes through a compact heat exchanger. That design saves space and can be highly efficient, but the narrow internal passages are more sensitive to mineral buildup.
Calcium and magnesium deposits can collect along those passages. As scale builds up, the water heater may have to work harder to reach the temperature you selected. You may notice lower water flow, fluctuating temperatures, unusual noise, longer waits for hot water, or an error code on the display.
A proper flush circulates a descaling solution through the heat exchanger to loosen and remove mineral deposits. It is preventive maintenance, not a repair for every problem. If the unit is leaking, repeatedly shutting down, or producing discolored water, it needs a closer diagnosis.
How often should you flush a tankless water heater?
For many homes, flushing once each year is a sensible baseline. Homes with especially hard water, high hot-water demand, or a water heater that runs nearly nonstop may benefit from more frequent maintenance. The manufacturer’s manual is the final authority because service requirements vary by model and warranty terms.
If you have a whole-home water softener, you may be able to extend the interval. That depends on whether the softener is working properly and whether it is sized for your household’s water use. A softener reduces scale, but it does not eliminate the need to inspect and maintain the water heater.
What you need before you start
Set aside roughly 60 to 90 minutes. Do not begin while anyone needs hot water, and let the unit cool before connecting hoses. You should also keep the owner’s manual nearby, since valve locations and shutdown procedures differ between brands.
For a standard tankless water heater flush, gather these items:
- A tankless water heater flush kit with a small submersible pump and two hoses
- A clean 5-gallon plastic bucket
- Approved tankless water heater descaler or plain white vinegar, if your manufacturer permits it
- Adjustable pliers, a screwdriver, and clean towels
Avoid using harsh chemicals, bleach, or acids that are not specifically approved for water-heater descaling. They can damage internal components, seals, or finishes. Never mix cleaning products.
Step 1: Shut off power and fuel safely
Start by turning off the electrical power to the water heater at the dedicated breaker. If you have a gas tankless unit, close the gas shutoff valve as well. This prevents the burner or heating elements from operating while the water connections are isolated.
Next, close the cold-water supply valve and the hot-water outlet valve. On most serviceable units, these are part of the isolation valve assembly below the water heater. Confirm that the valves are fully closed before opening the service ports.
If you are uncertain which valve is which, stop and consult the unit manual or schedule service. Forcing the wrong valve or working around gas piping is not worth the risk.
Step 2: Release pressure and connect the flush hoses
Place towels below the service connections to catch residual water. Carefully open the hot and cold service ports. A small amount of water may drain out, especially if the unit was recently in use.
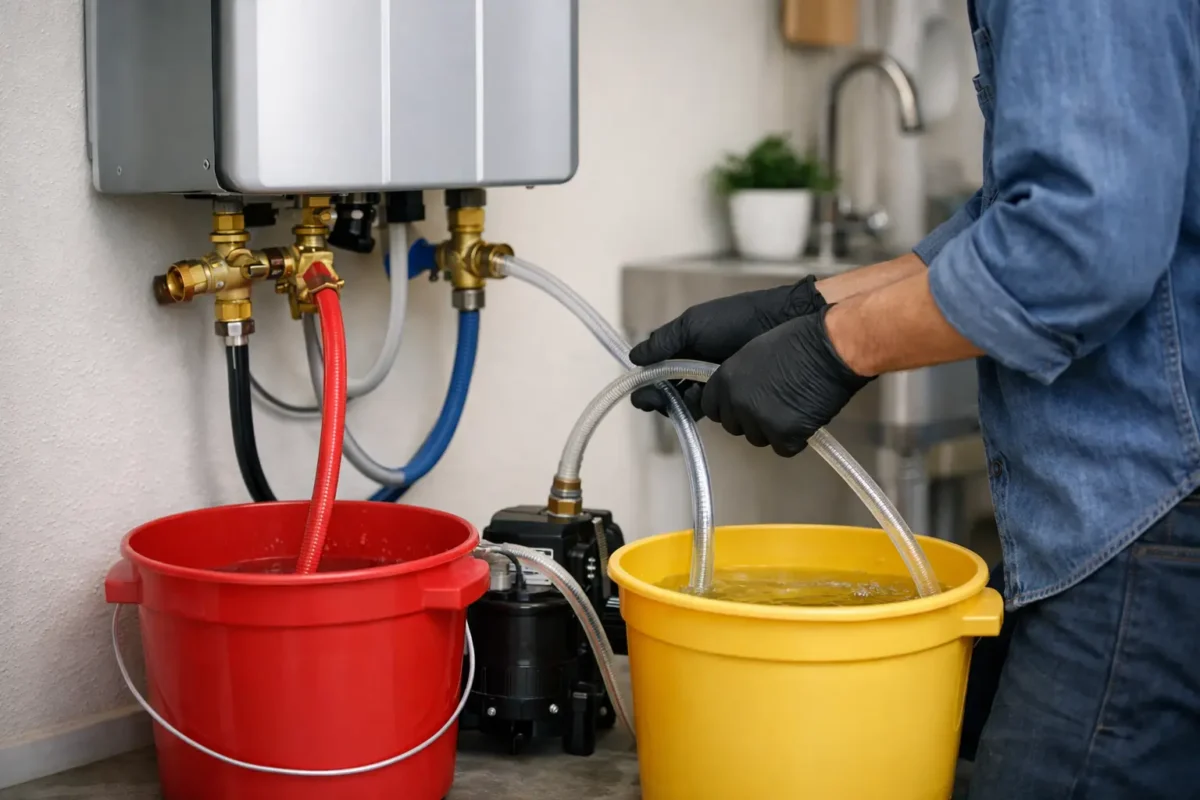
Connect one hose from the pump outlet to the cold-water service port. Connect the second hose from the hot-water service port and place its loose end into the bucket. Put the submersible pump in the bucket before adding the descaling solution.
The loop should be simple: solution leaves the bucket through the pump, enters the unit through the cold side, travels through the heat exchanger, and returns through the hot side. Check that each hose is secure. A loose connection can create a messy spill quickly.
Step 3: Circulate descaling solution
Pour the manufacturer-approved descaling solution into the bucket. If you are using white vinegar and your manual allows it, use enough to keep the pump fully submerged throughout the process.
Open the hot and cold service valves, then plug in the pump. Let the solution circulate for the period recommended by the water heater manufacturer. Many units need 30 to 45 minutes, although heavily scaled equipment or specific approved products may call for a different duration.
You may see bubbles, cloudiness, or small particles returning to the bucket. That can be normal as mineral deposits break down. Do not leave the equipment unattended, and do not run the household faucets while the flush is in progress.
Step 4: Rinse the heat exchanger with clean water
When the circulation period is complete, unplug the pump. Close the cold-water service valve first, then carefully remove the pump hose from the cold service port. Empty the used solution according to the product directions.
Leave the return hose from the hot service port positioned in the empty bucket. Open the home’s cold-water supply valve slowly and allow fresh water to flow through the unit and out of the hot service hose. Continue until the water runs clear and any cleaner odor is gone. A few minutes of rinsing is common, but follow your manufacturer’s instructions if they specify a longer rinse.
Once rinsed, close the hot service port and then close the cold service port. Remove the remaining hose and tighten both service caps securely. Wipe the area dry so you can easily spot any drips when the system restarts.
Step 5: Restore the water heater and check your work
Open the cold-water isolation valve and the hot-water outlet valve. Before restoring power or gas, open a hot-water faucet inside the home for a minute or two. This helps purge air from the water line. Spitting or sputtering at the faucet is normal at first.
Check the service valves, caps, and nearby connections for leaks. If everything remains dry, reopen the gas valve for a gas unit and restore electrical power at the breaker. Turn on a hot-water faucet and confirm that the water heater starts normally and holds a stable temperature.
If an error code appears, do not keep resetting the unit. Record the code and arrange professional service. A code after flushing may point to a separate issue, such as a dirty water filter, venting concern, failed sensor, or an installation problem.
Do not overlook the water filter
Many tankless water heaters include a small cold-water inlet filter. It catches sediment before it reaches the heat exchanger, and it should be checked during annual maintenance. Shut off the water and follow the manual to remove, rinse, and reinstall the filter.
A clogged inlet filter can cause reduced flow and performance complaints that look similar to scale buildup. It is a small step, but it can make a meaningful difference in how consistently your water heater operates.
When to call a professional
DIY flushing makes sense only when the unit is accessible, the service valves are installed, and you are comfortable working carefully around plumbing connections. Call a licensed technician if you smell gas, see corrosion or leaking, cannot identify the valves, have no isolation ports, or notice repeated error codes.
Professional maintenance can also be worthwhile for homeowners who prefer a complete system check. In addition to flushing, a technician can inspect combustion components, venting, condensate drainage, gas connections, electrical connections, filters, and overall operating performance. That is particularly valuable for older units or systems that have missed several years of maintenance.
For San Jose homeowners, HVAC DOME can provide dependable tankless water heater maintenance with clear recommendations and upfront pricing. The goal is not simply to remove scale, but to help your hot water stay safe, efficient, and ready when your household needs it.
A yearly calendar reminder is often the easiest way to stay ahead of mineral buildup. Giving your tankless water heater a little attention before performance drops can spare your home from a cold-shower surprise.